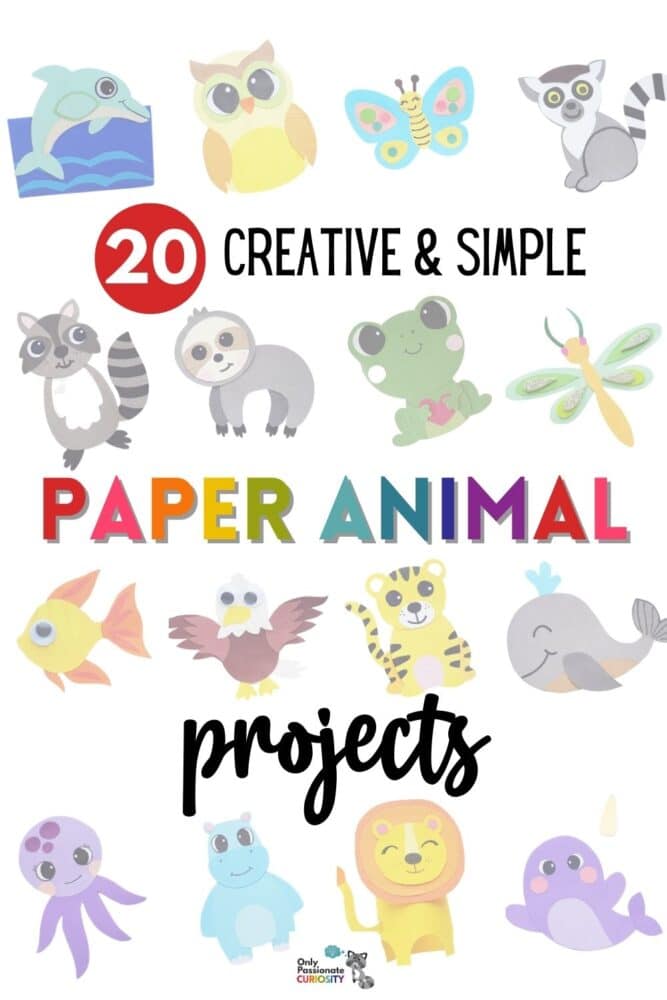
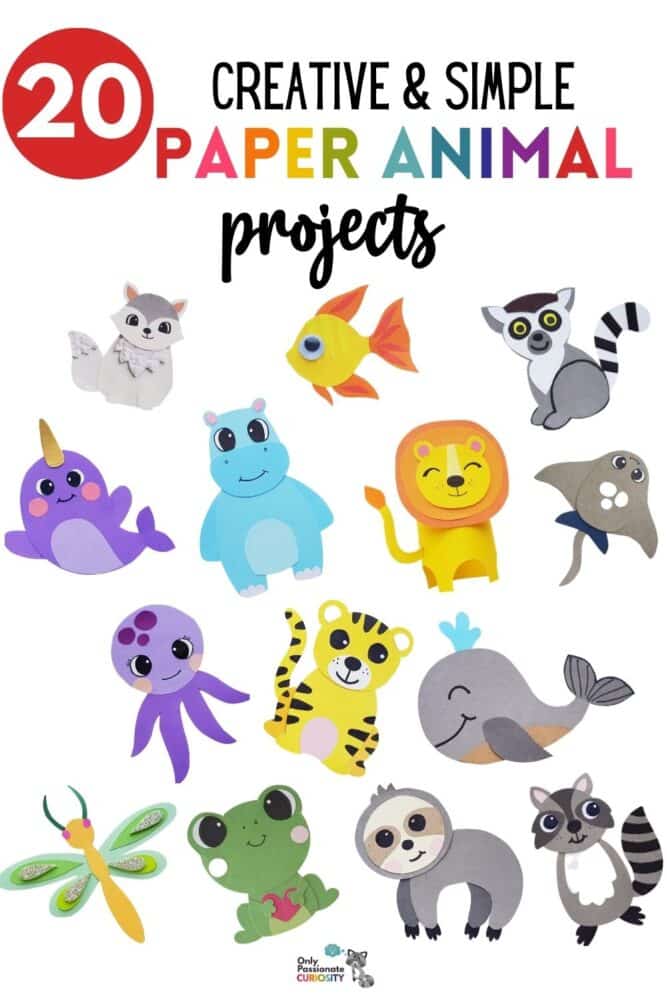
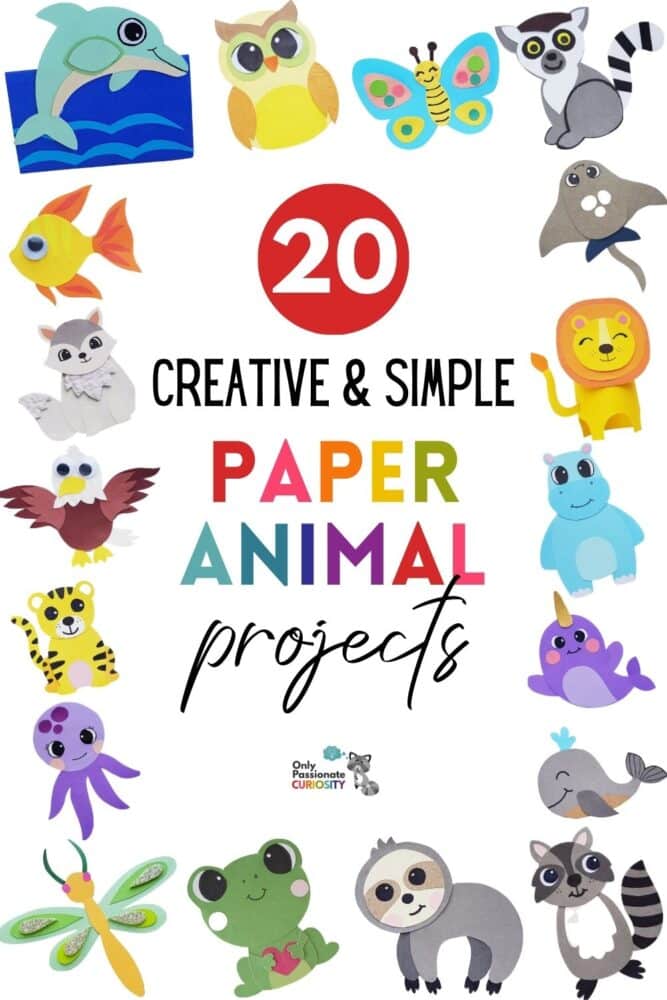
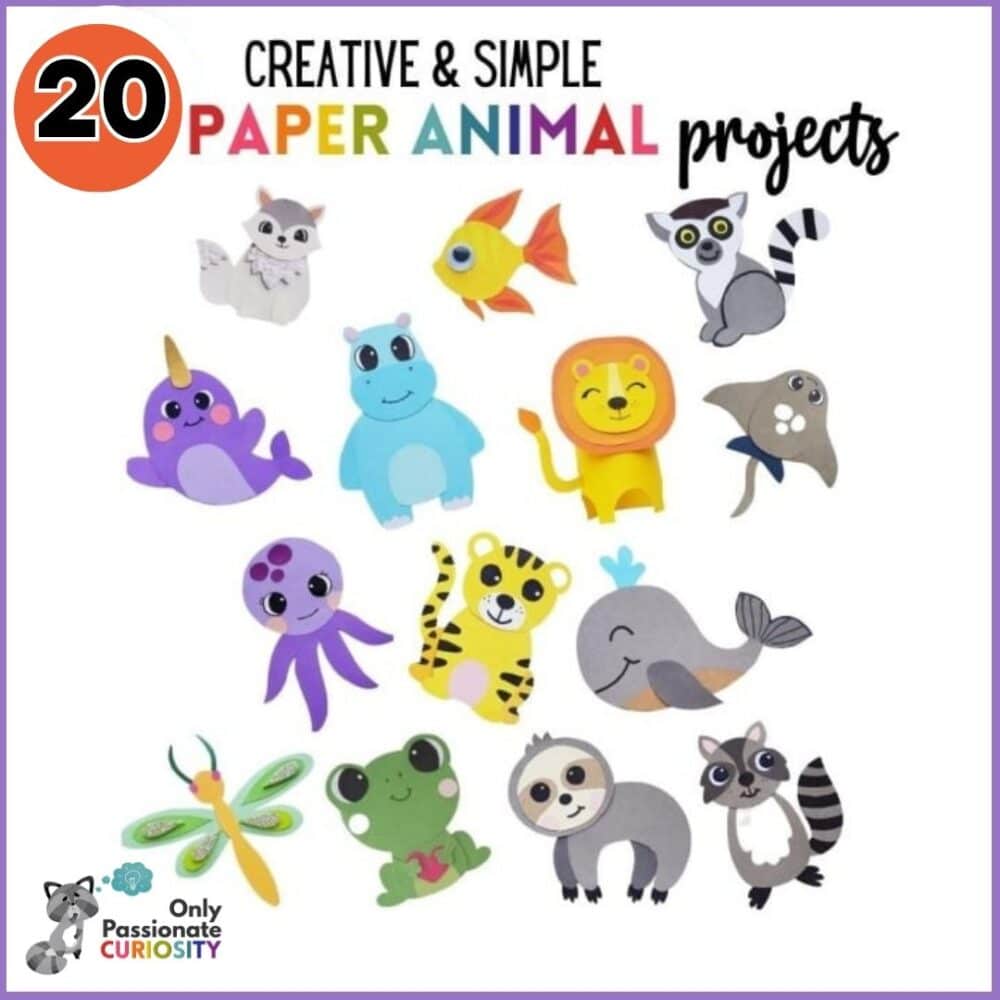
20 Creative & Simple Paper Animal Projects
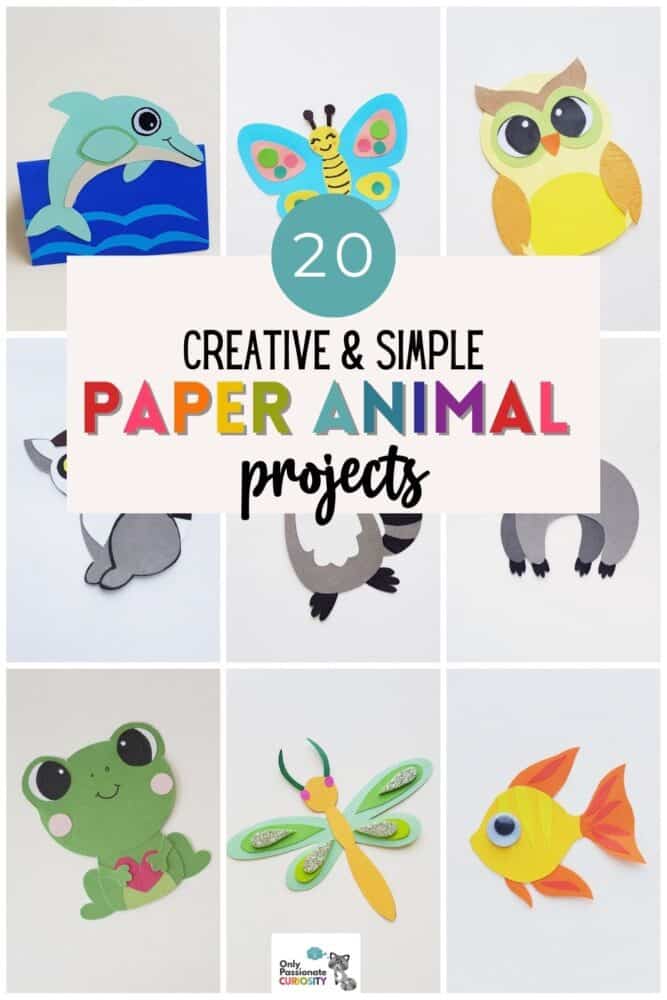
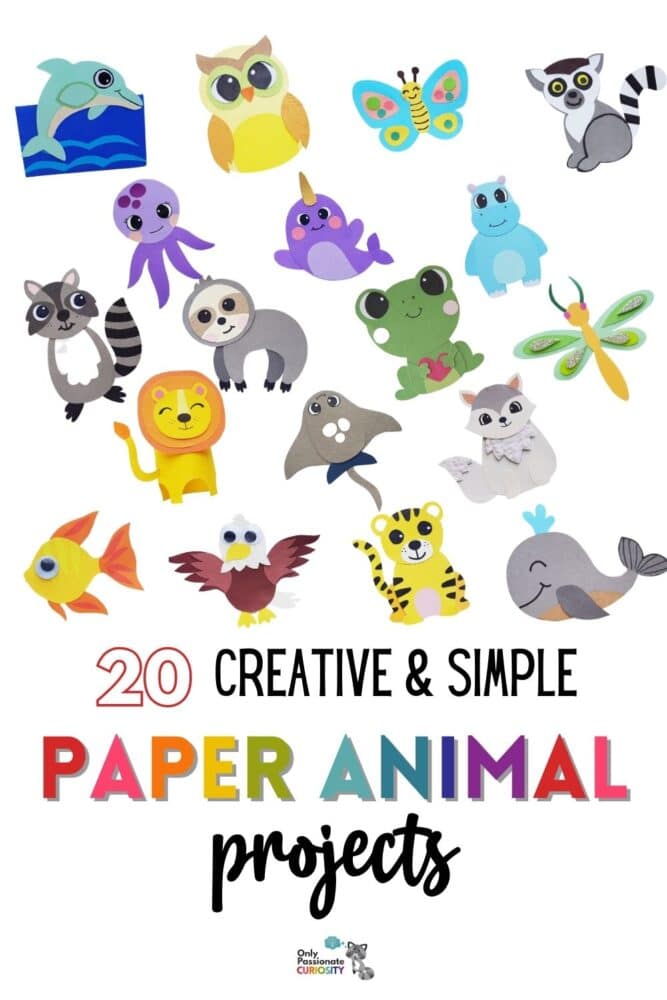
Welcome to our exciting and “crafty” world of paper animals, where imagination knows no bounds! Engaging children in artistic activities not only sparks their creativity but also enhances their cognitive skills and dexterity. With just a few sheets of paper, some scissors, and a dash of enthusiasm, your little ones can embark on a fantastic journey of creating their very own menagerie of delightful paper animals.
In this blog post, we’ll guide you through a collection of fun and easy paper animal crafts that are perfect for children of all ages. From the majestic lion to the graceful butterfly, these crafts will not only provide hours of entertainment but also help children develop their fine motor skills, patience, and attention to detail.
Why Paper Animals as Crafts?
Paper crafts are an excellent way to introduce children to the world of art and encourage their creativity. Unlike more complex crafts, paper animals offer a fantastic starting point for young crafters and artists. Paper is readily available, inexpensive, and versatile, making it an ideal medium for young minds to explore and experiment with.
Not only are paper crafts accessible, but they also allow children to practice their cutting, folding, and gluing skills, which are essential for their overall development. As they engage in these crafts, they’ll also learn about different animals, their characteristics, and their habitats. It’s a delightful combination of learning and play!
So, gather your supplies, clear a crafting space, and get ready to embark on a thrilling adventure of creativity and imagination. Remember, the beauty of paper animals lies in the process, not just the final product. Encourage your children to enjoy every moment of their creative journey, and watch as their artistic skills and confidence grow.
Let’s get crafty and unleash the wild wonders of paper animals!
Table of Contents
Supplies Needed for Most Paper Animals
While each craft has its own list of supplies, here are the main items you’ll need, for easy reference. You probably have most of these supplies on hand. If not, these affiliate links help us keep our website operating and enable us to keep providing you with unique and educational content. Thank you for your support!


Paper Animals – Mammals That Live on the Land
Our first set of paper animals is various mammals you’ll find living on the land. These creatures can be found in various parts of the world, and each one has distinct features, which makes for a fun craft project.
So, grab your supplies and have fun making these paper animals!
Arctic Fox Paper Animals
The Arctic fox is a fascinating creature that lives in the cold Arctic regions. It can survive in temperatures as low as -50 degrees Celsius! Did you know that the Arctic fox has thick fur that changes color with the seasons? In the winter, its fur is pure white to blend in with the snowy landscape. In the summer, it turns brown or gray to match the rocks and plants. Another cool fact is that the Arctic fox has furry paws that act like snow boots, helping it walk on the snow without sinking. These clever foxes are also skilled hunters and can catch their prey by pouncing or digging through the snow.
What You’ll Need for the Project:
- Colored craft paper
- Embossed paper
- Sharpie
- Craft glue
- Pencil
- Scissors
- Arctic Fox Template (opens in new window)
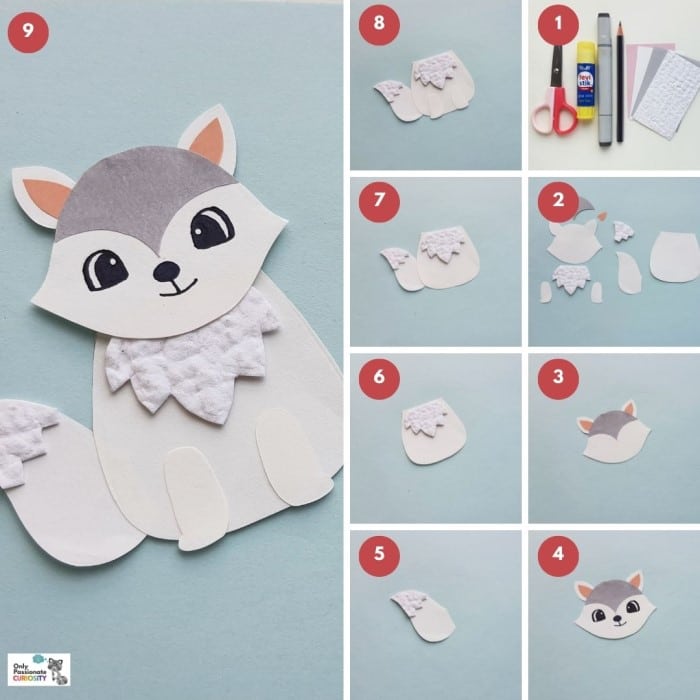
How to Make the Arctic Fox Paper Animals:
- Gather your supplies.
- Select white, grey, and pink craft paper, and white embossed paper for the fox papercraft. Trace the head, body, legs, and tail base on the white or cream craft paper. Trace the inner ear patterns on the pink paper. Next, trace the tail tip and chest fur on the white embossed paper, and trace the forehead pattern on the grey paper. Cut out the traced patterns nicely.
- Glue the inner ear cut-outs to the middle of the ear parts of the head pattern. Attach the forehead pattern on the top of the head pattern with glue.
- Use a black permanent marker to draw the eyes, nose, and mouth of the papercraft fox pattern.
- Attach the tail tip cut-out on the tip of the tail base.
- Glue the chest-fur cut-out on the top side of the body base cut-out.
- Attach the tail pattern on any one side of the body base pattern.
- Attach the leg cut-outs near the bottom side of the body pattern.
- Finally, glue the head pattern on the top side of the body pattern.
Lion Paper Animals
Lions are incredible creatures that live in the grasslands and savannas of Africa. Did you know that lions are the only cats that live in big groups called prides? Each lion has its own special roar that can be heard from miles away. Lions are famous for their majestic manes. While the males have impressive manes, it’s the lionesses who do most of the hunting for the pride. They work together as a team to bring down big prey. Lions are amazing creatures that inspire awe in people all around the world!
What You’ll Need for the Project:
- Colored cardstock paper
- Craft glue
- Pencil
- Scissors
- Lion Template (opens in new window)
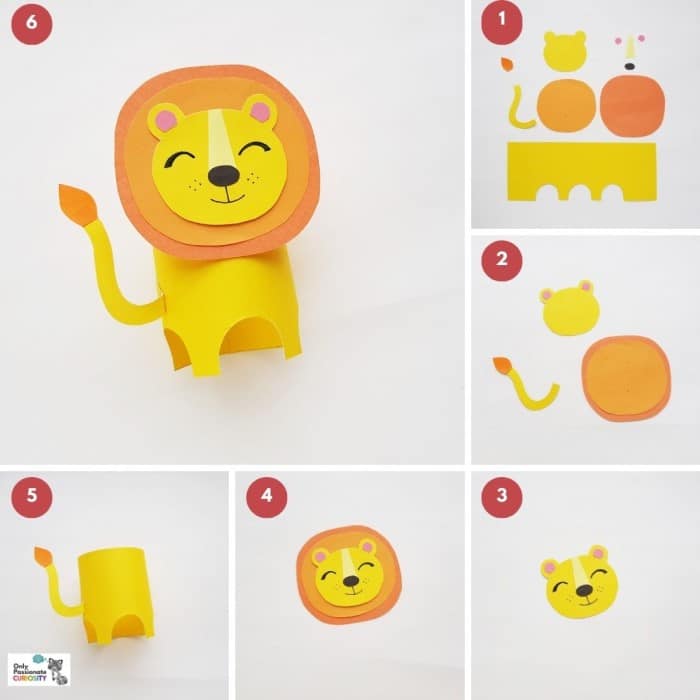
How to Make the Lion Paper Animals:
- Select two different shades of yellow and two different shades of orange craft paper. Trace the mane and the tail tip patterns on orange paper. Then trace the tail, body base, and head patterns on yellow paper. Next, you’ll want to trace the inner ear patterns on pink paper, the nose on a different shade of yellow paper; and finally, the nose tip on black paper. Carefully cut all these out.
- Attach the inner ear cut-outs in the middle of the ear parts joined to the head pattern; attach the tail tip on either side of the tail pattern and the small mane pattern in the middle of the big mane pattern.
- Glue the nose and the nose tip cut-outs on the head cut-out, from the top end. Use a black Sharpie to draw the eyes, mouth, and mustache of the lion.
- Attach the head pattern in the middle of the mane.
- Take the body base cut-out and roll it into a tube shape, joining both open ends to secure the shape. Glue the tail pattern to either side of the body tube pattern.
- Attach the head pattern on the top side (the plain side) of the body tube pattern to complete the craft.
Hippo Paper Animals
Hippos are fascinating animals often found in rivers and lakes in Africa. Did you know that hippos are one of the largest land mammals? They are huge and can weigh as much as four cars! Despite their size, hippos are excellent swimmers and spend most of their time in the water to keep cool. Hippos have big, powerful jaws with long, sharp teeth. They use these teeth to crush and chew on grass and other vegetation, which makes up their diet. Hippos are herbivores, which means they only eat plants.
What You’ll Need for the Project:
- Colored craft papers
- Craft glue
- Pencil
- Sharpie
- Scissors
- Hippo Template (opens in new window)
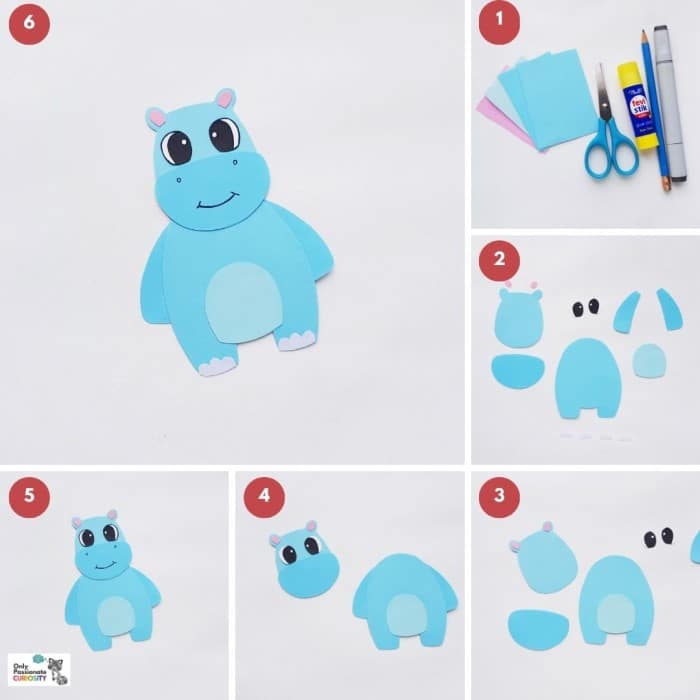
How to Make the Hippo Paper Animals:
- Select two or three different shades of the same-colored craft paper for the paper hippopotamus craft. We’re using three different shades of blue craft paper. Trace the head and body patterns on the medium shade, the arms (upper legs of the craft) and the bottom part of the face patterns on the dark shade, and lastly, the belly pattern on the lighter shade of the selected paper. Trace the toe patterns on white paper and the inner ear patterns on pink paper. Cut them out nicely.
- Glue the inner ear patterns to the middle of the ear parts joined to the head cut-out.
- Stick the two separate leg cut-outs on both sides of the body base cut-out. Glue the half-circular cut-out on the bottom side of the head cut-out. Also, glue the eye cut-outs near the top part of the head cut-out.
- Glue the head pattern on the top side of the body pattern. Use a sharpie to draw the nose, mouth, and eye outlines.
- Attach the toe cut-outs along the bottom sides of the leg parts joined to the body base cut-out.
- Stick the two other toe cut-outs on the open ends of the upper leg patterns to complete the craft.
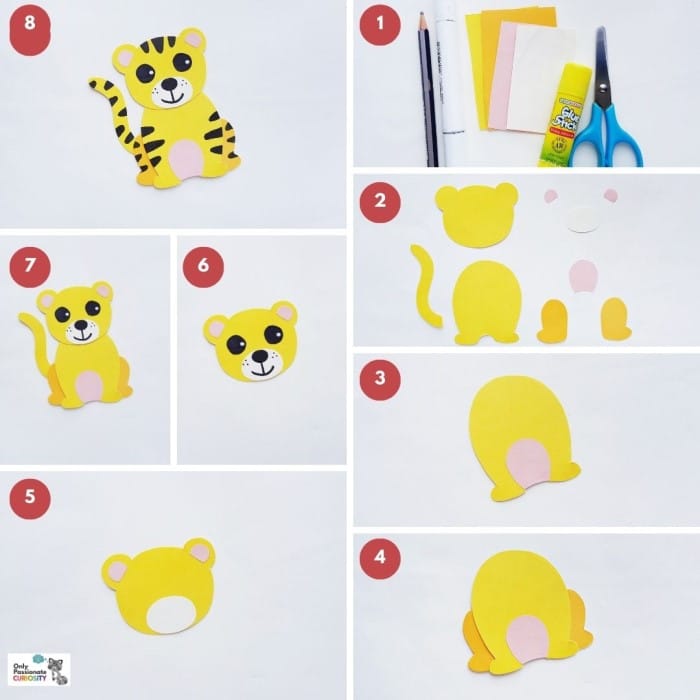
Tiger Paper Animals
Tigers are magnificent creatures that roam the forests and grasslands of Asia. They are the largest cats in the world! Did you know that each tiger has its own unique pattern of stripes? No two tigers have the same pattern, just like our fingerprints! Tigers are excellent hunters and can leap up to 30 feet in a single bound! They have sharp teeth and retractable claws, which means they can extend their claws when needed for hunting or climbing trees. Unlike most cats, tigers love to swim! Sadly, tigers are endangered, which means there are not many left in the wild. Tigers are truly fascinating animals that captivate our imagination with their beauty, strength, and grace.
What You’ll Need for the Project:
- Colored craft papers
- Craft glue
- Sharpie
- Pencil
- Scissors
- Tiger Template (opens in new window)
How to Make the Tiger Paper Animals:
- Gather your supplies.
- Select cream (or white) paper, pink paper, and two shades of yellow craft paper. Trace the body, head, and tail on any of the yellow papers, and trace the two leg patterns on the other yellow paper. Trace the oval shape on the cream paper and the rest of the three patterns on pink paper. Carefully cut out the traced pieces.
- Attach the big pink pattern on the bottom side of the body pattern with glue.
- Attach the two separate leg patterns on the back side of the legs attached to the main body pattern.
- Glue the two small pink patterns (inner ear parts) to the middle of the main ear parts attached to the head pattern. Attach the oval-shaped cram paper near the bottom side of the head pattern.
- Use a black sharpie to draw the eyes, nose, mouth, and whiskers of the paper tiger.
- Attach the head on the top side of the body base. Attach the tail on the back side of the body pattern, on either side.
- Use the black marker to draw stripes on the head, body, legs, and tail of the paper tiger craft to complete it.
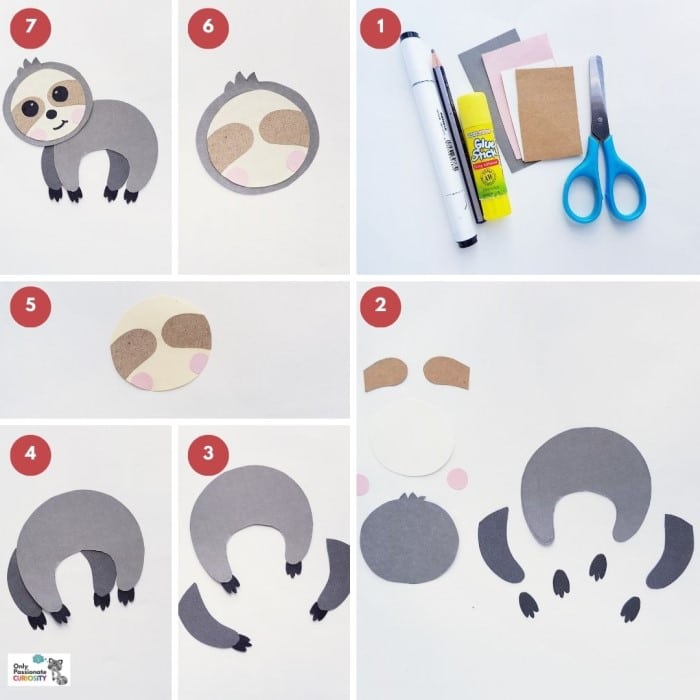
Sloth Paper Animals
Sloths are fascinating creatures that live in the tropical rainforests of Central and South America. Did you know that sloths are the slowest animals in the world? They move so slowly that algae can grow on their fur! Sloths spend most of their time hanging upside down in trees, using their long claws to grip the branches tightly. They are excellent climbers and can even sleep while hanging upside down! Sloths have a unique diet of leaves, and their slow metabolism helps them conserve energy. They are also very peaceful and gentle creatures.
What You’ll Need for the Project:
- Colored craft papers
- Craft glue
- Sharpie
- Pencil
- Scissors
- Sloth Template (opens in new window)
How to Make the Sloth Paper Animals:
- Gather your supplies.
- Select brown, cream, pink, black, and two different shades of grey craft paper. Trace the body pattern on light grey paper and the two separate legs on dark grey paper. Trace the circle (face) on cream paper, the paws on black paper, the two small circles on pink paper, and the remaining patterns (eye patch) on brown paper. Cut out the traced patterns.
- Stick the paw patterns on the open ends of the leg parts attached to the body as well as to the separate legs.
- Glue the separate legs to the back side of each leg attached to the body.
- Glue the pink circles and the two brown eye patches on the round cream cut-out.
- Stick the cream circle in the middle of the head pattern.
- Attach the head pattern to the front side of the body pattern. Use a black Sharpie to draw the eyes, nose, and mouth of the paper sloth.
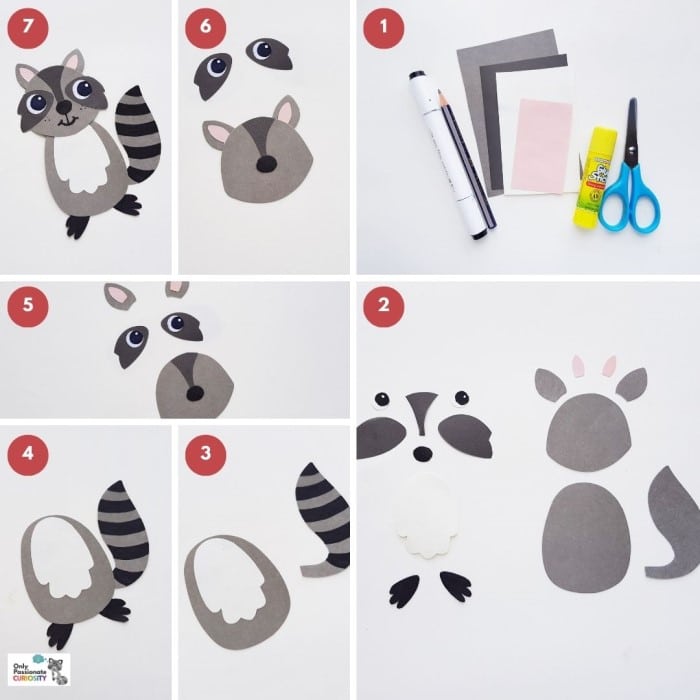
Raccoon Paper Animals
Raccoons are clever creatures that can be found in North and Central America. They have a unique appearance with black markings around their eyes. Raccoons are great problem solvers and can even open jars and containers! Raccoons have a varied diet and are skilled foragers. They can eat almost anything, from fruits and nuts to insects and small animals. Did you know that raccoons are excellent climbers? They have sharp claws that help them scramble up trees and onto rooftops! Raccoons are nocturnal, which means they are most active during the night.
What You’ll Need for the Project:
- Colored craft papers
- Craft glue
- Pencil
- Scissors
- Black Sharpie
- Raccoon Template (opens in new window)
How to Make the Raccoon Paper Animals:
- Gather your supplies.
- Select dark grey or brown paper, cream or off-white paper, and pink, and black craft paper for the raccoon animals papercraft. Trace the template patterns on the selected papers and cut them out nicely.
- Use a black Sharpie to add strips on the tail cut-out. Attach the inner body pattern (small oval-shaped pattern with a scalloped border on one side) to the main body pattern (big oval-shaped piece).
- Glue the tail to the back of the body pattern. Attach the two paw patterns to the bottom side of the body pattern.
- Next, you’ll want to glue the eye cut-outs onto the eye patch cut-outs, glue the inner ear parts onto the main ear parts, and attach the V-shaped pattern on the top middle part of the head. Finally, attach the small round cut-out, which is the nose to the bottom side of the V pattern.
- Attach the ears on both sides of the head’s top end.
- Next, glue the eye parts onto the head and then attach the head to the top of the main pattern. Use a black pen to draw the mouth of your paper raccoon.
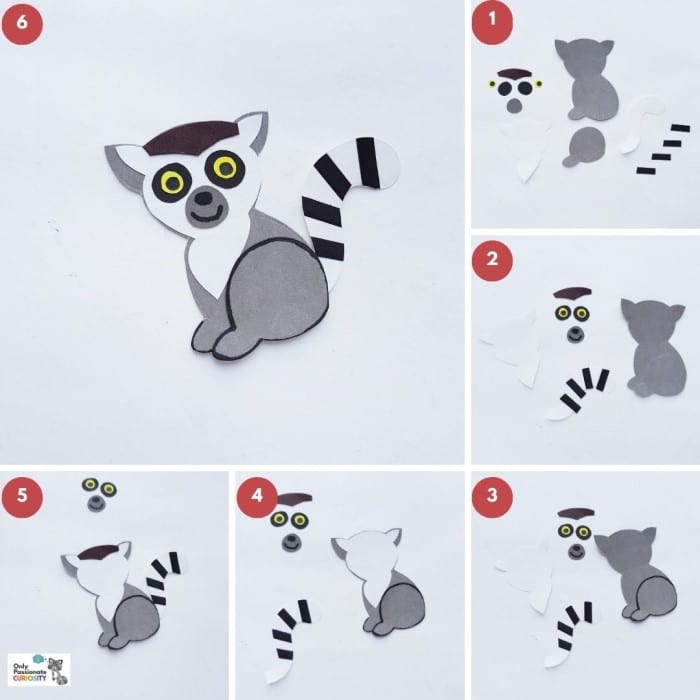
Lemur Paper Animals
Lemurs are fascinating animals that are found only on the island of Madagascar. They are known for their unique appearance, playful nature, and their big eyes! Lemurs are excellent climbers and spend a lot of time in trees. They have long, agile tails that help them maintain balance as they leap from branch to branch. Did you know that lemurs have a special way of communicating? They use different sounds and even scent marking to talk to each other. Lemurs are herbivores, which means they mainly eat fruits, leaves, and flowers.
What You’ll Need for the Project:
- Colored craft papers
- Pencil
- Marker
- Scissors
- Craft glue
- Lemur Template (opens in new window)
How to Make the Lemur Paper Animals:
- Select white, black, yellow, and gray craft paper for this craft. Trace the patterns on the craft paper as marked on the template, and then cut out the traced patterns.
- Attach the yellow round shapes (eyes) to the small black circular shapes. Take the gray circular pattern and draw the nose and mouth on it. Glue the front lower body pattern on the bottom side of the main body pattern. Attach the black strips on the tail.
- Use a black pen to trace around the border of the lower body pattern. Trim the sides of the strips attached to the tail.
- Attach the front body pattern (white) on the top of the body base.
- Glue on the tail and the top black pattern of the head.
- Attach the eyes and mouth to complete the lemur craft.
Deer and Fawn Paper Animals

Deer are graceful and gentle animals that can be found in many parts of the world. Did you know that deer can jump really high? They can easily leap over fences and other obstacles. A deer also has excellent hearing and a keen sense of smell, which helps them detect danger. In the spring, female deer, called does, give birth to their babies, called fawns. Fawns are born with their eyes open and can walk within a few hours of being born! Fawns stay close to their mothers and rely on them for protection and milk. As they grow, fawns start to eat grass and leaves, just like their parents.
What You’ll Need for the Project:
- Colored craft papers
- Black marker pen
- Pencil
- Scissors
- Craft glue
- Deer and Fawn Template (opens in new window)
- Meadow Template
How to Make the Deer and Fawn Paper Animals:
- Select brown or orange craft paper for the deer and fawn craft; select blue craft paper for the background and three shades of green for the meadows. Trace the deer pattern on the selected craft paper. Cut out the traced patterns.
- Attach the small patterns on the main body pattern of the deer to complete the deer papercraft.
- Use a marker to draw the eyes and other details of the deer papercraft. Similarly, craft the fawn.
- Trace and cut out the three meadow patterns from green craft paper.
- Take the tallest meadow pattern and apply glue along the three straight ends of the meadow pattern.
- Attach the meadow along the bottom end of the background.
- Similarly, attach the two other meadow layers, placing the shortest meadow layer on the front.
- You can place the deer and fawn paper animals inside the meadow pockets. Add some paper heart cut-outs to the craft to make it look adorable!
Paper Animals – Creatures That Swim in the Water
This next collection of paper animals are those that swim in the water. As over two-thirds of Earth is covered in water, you can imagine that there are a lot of creatures in the lakes, rivers, seas, and oceans of the world!
Here are just a few of them that make fun papercrafts.
Stingray
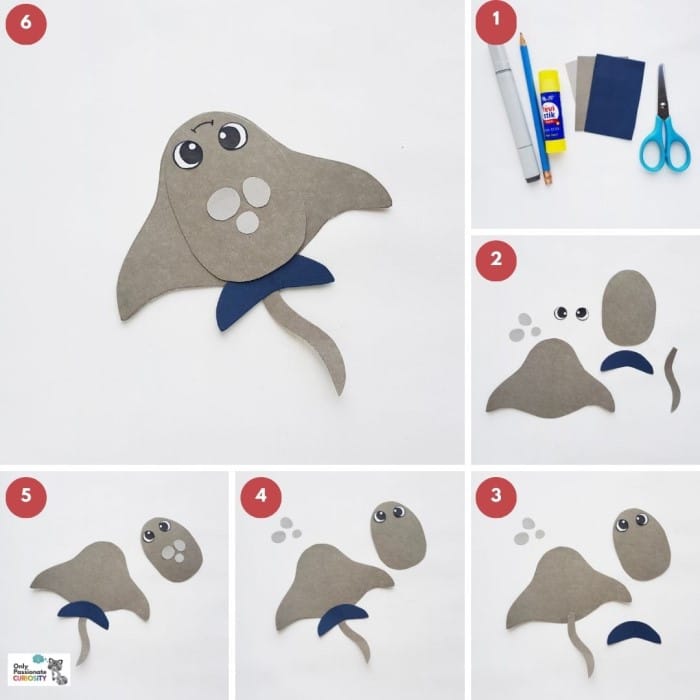
Stingrays are fascinating creatures that live in oceans and seas around the world. Stingrays belong to the same family as sharks. Stingrays have unique bodies that are flat and round, like a pancake! They have long, whip-like tails with venomous stingers at the end, which they use for defense. Despite their intimidating stingers, most stingrays are actually gentle and prefer to swim away from danger. They have a special way of moving through the water by flapping their fins, almost like they’re flying underwater.
What You’ll Need for the Project:
- Colored craft papers
- Craft glue
- Sharpie
- Pencil
- Scissors
- Stingray Template (opens in new window)
How to Make the Stingray Paper Animals:
- Gather your supplies.
- Select two different shades of craft paper for the stingray fish papercraft. Trace the disk (large pattern), the oval shape, pelvic fin, body spots, and tail fin on the selected papers as you like. Cut out the traced patterns using scissors. Cut out the eye patterns from the template. Make sure to trace the spots and the oval shape on different colored papers.
- Attach the tail fin on the backside of the disk cut-out and glue the eye cut-outs near the front side (the narrow end) of the oval-shaped cut-out.
- Attach the pelvic fin on the backside of the disk cut-out; make sure the tail fin is placed in the middle of the pelvic fin.
- Glue the spot cut-outs on the top side of the oval-shaped cut-out. Keep the spots near the eyes.
- Attach the oval-shaped cut-out on the top, middle part of the disk pattern, keeping the eyes to the opposite side of the fins. Use a sharpie to draw the mouth of the stingray paper fish.
Narwhal
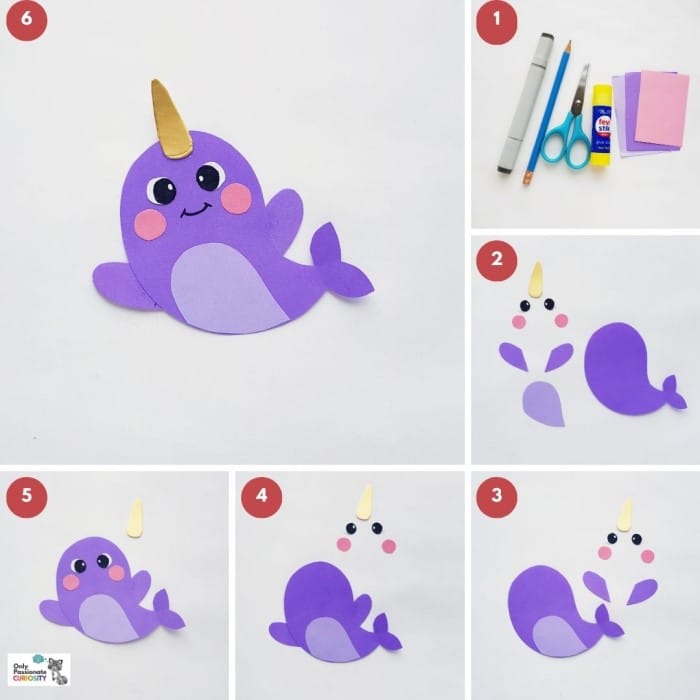
Narwhals are incredible creatures that live in the icy Arctic waters. Did you know that narwhals have a long, spiraled tooth that looks like a unicorn’s horn? This tooth can grow up to 10 feet long and is one of their canine teeth. Male narwhals usually have this tusk, while females may have a smaller, less noticeable one. Scientists believe that the narwhal’s tusk helps them with various things, like finding food and communicating with other narwhals. Narwhals can often be seen swimming and diving together in groups called pods.
What You’ll Need for the Project:
- Colored craft papers
- Craft glue
- Pencil
- Sharpie
- Scissors
- Narwhal Template (opens in new window)
How to Make the Narwhal Paper Animals:
- Gather your supplies.
- Select two different shades of the same-colored paper for the narwhal craft. Select pink paper for the blush patterns and golden paper for the horn. Trace the body base and side fins on the selected paper and trace the front body pattern on the other shade of the colored craft paper. Cut out the traced patterns and the eye patterns from the template.
- Glue the front body cut-out to the underside of the body base cut-out.
- Glue the side fins on both sides of the body base pattern.
- Add the eyes and blush cut-outs near the top end of the narwhal body pattern.
- Attach the horn cut-out on the top-middle part of the body base. Lastly, use a black Sharpie to draw the mouth of the papercraft narwhal.
Octopus
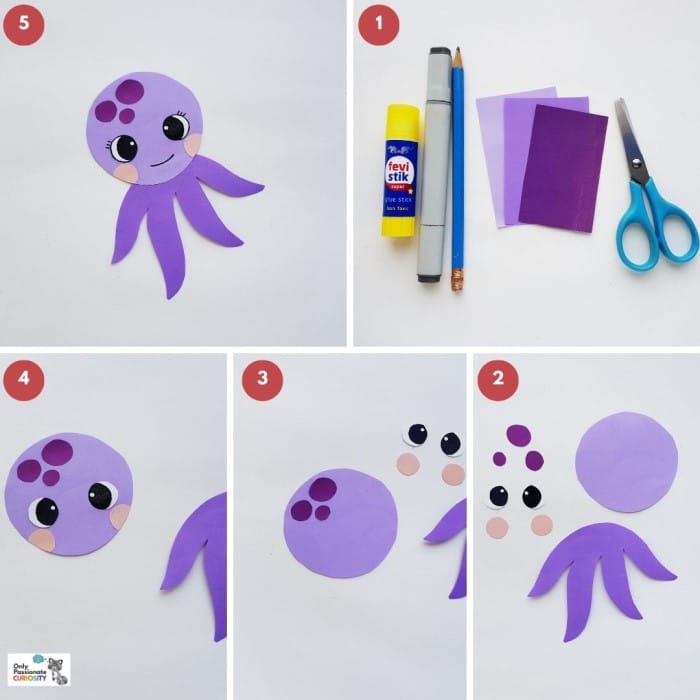
Octopuses are fascinating sea creatures known for their incredible intelligence and unique abilities. Did you know octopuses can change colors and textures? It’s true! They can blend in with their surroundings by changing the color and pattern of their skin, which helps them hide from predators or sneak up on their prey. Another interesting fact is that octopuses have three hearts! Two of their hearts pump blood to their gills, while the third heart pumps blood throughout their body. Octopuses are known for their problem-solving skills and can use their tentacles to open jars or solve puzzles.
What You’ll Need for the Project:
- Colored craft papers
- Craft glue
- Sharpie
- Pencil
- Scissors
- Octopus Template (opens in new window)
How to Make the Octopus Paper Animals:
- Gather your supplies.
- Select colored craft papers for the papercraft octopus. We’re using three shades of purple for each part of the papercraft octopus. The template includes a head, head spots, tentacles, blush (small round shapes), and eyes. You can use the eyes from the template and trace the rest of the patterns and cut them out from the selected paper.
- Glue the head spot cut-outs near the top side of the head cut-out (the big round cut-out).
- Glue the eyes and the blush cut-outs on the head cut-out as well. We attached the eyes along the middle of the head and the blush cut-outs near the bottom side of the head cut-out.
- Attach the head pattern on the top side (the curved side) of the tentacles cut-out. Use a sharpie or gel pen to draw the mouth of the papercraft octopus.
Whale

Whales are magnificent creatures that live in the oceans around the world. Did you know that whales are the largest animals on Earth? It’s true! The blue whale, which is the largest whale species, can grow longer than a school bus and weigh as much as 25 elephants combined! Whales communicate with each other through songs. These songs can travel long distances underwater and help whales find their way or attract a mate. Despite their enormous size, whales are gentle creatures that spend their days swimming, playing, and feeding on tiny ocean organisms like krill or fish.
What You’ll Need for the Project:
- Colored craft papers
- Craft glue
- Sharpie
- Pencil
- Scissors
- Whale Template (opens in new window)
How to Make the Whale Paper Animals:
- Gather your supplies.
- Select blue, brown (or pink), and two different shades of grey craft paper. Trace the water splash pattern on the blue paper, and the lens-like pattern (bottom side of the whale) on the brown (or pink) paper. Trace the body base on either of the grey papers and the fin pattern on the other grey paper. Cut out the traced patterns nicely.
- Stick the lens-like pattern along the bottom side of the whale body base.
- Glue the fin pattern over the bottom part of the paper whale.
- Attach the water splash pattern on the top side of the head of the paper whale.
- Use a black sharpie to draw the eyes, mouth, and other details of the paper whale to complete the craft.
Angelfish
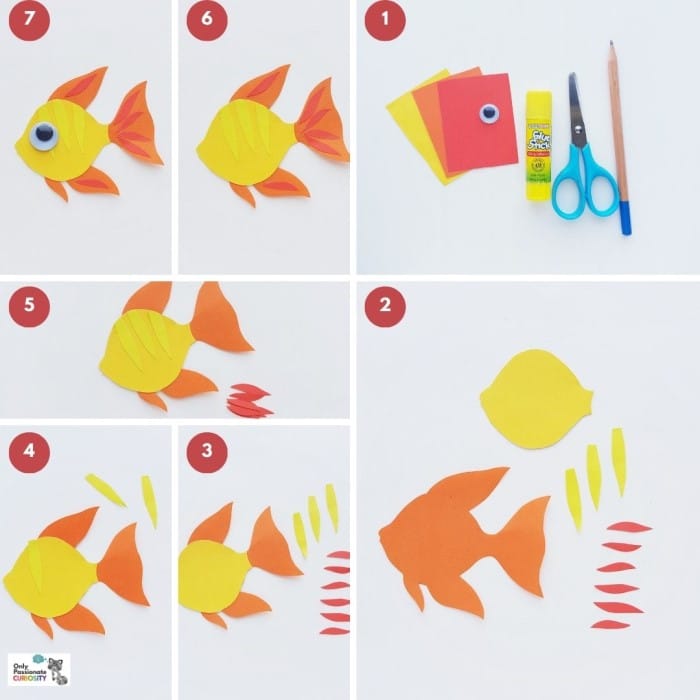
Angelfish are colorful fish that live in freshwater rivers and streams, particularly in South America. They are known for their unique shape, resembling a triangular kite. These fish come in a variety of vibrant colors, including shades of orange, yellow, silver, and black. Did you know that angelfish can change colors depending on their mood or surroundings? Angelfish are social creatures and usually swim in groups called schools. They are peaceful and friendly, but they can be territorial when it comes to their nesting areas. Angelfish are omnivores, which means they eat both plants and small aquatic creatures.
What You’ll Need for the Project:
- Colored craft papers
- Googly eyes
- Pencil
- Scissors
- Craft glue
- Angelfish Template (opens in new window)
How to Make the Angelfish Paper Animals:
- Gather your supplies.
- Print and cut out the patterns from the provided template. Select colored craft papers for the angelfish craft. Select different colored craft papers for each pattern. Use a pencil to trace the patterns on the selected craft papers. Use scissors to cut out the traced papers.
- Attach the circular pattern on the fish base pattern; make sure to match the sides of both patterns nicely.
- Take the three long strips and attach them along the top end of the fish (the end with one fin).
- Glue three or more of the longer strips side by side along the top end.
- Now take the shorter strips and attach them to the fins of the fish base.
- Glue a googly eye on the front of the paper fish. Use a black pen to add a smiley face to the fish. Mix and match different colored craft papers for variation.
Dolphin
Dolphins are incredible marine mammals with streamlined bodies that are perfect for swimming. They are excellent swimmers and can leap out of the water and perform acrobatic flips and spins! Dolphins are social animals and live in groups called pods. They communicate with each other using clicks, whistles, and body movements. Dolphins are very smart and can learn new things quickly. They are known to help each other, like pushing injured or sick dolphins to the surface to help them breathe. Dolphins are also friendly towards humans. They sometimes swim alongside boats and enjoy interacting with people.
What You’ll Need for the Project:
- Colored craft papers
- Pencil
- Pen
- Scissors
- Craft glue
- Dolphin Template (opens in new window)
How to Make the Dolphin Paper Animals:
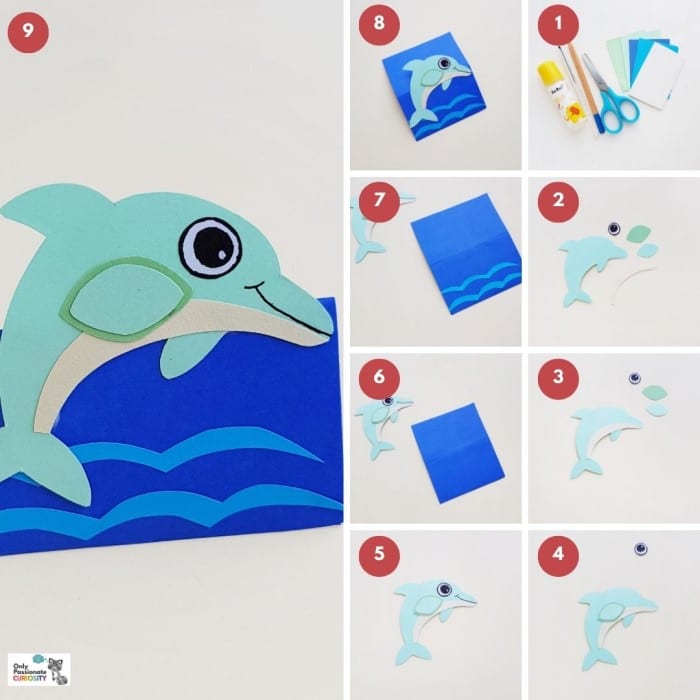
- Gather your supplies.
- Select two or three shades of craft paper for the dolphin and two different shades of blue for the sea. Let’s start with the dolphin craft. Trace the dolphin patterns on the selected craft paper and cut them out nicely.
- Attach the curved strip pattern on the lower part of the dolphin. The bottom end of both patterns (the body pattern and the thin curved strip pattern) should be aligned.
- Attach the two fin patterns together, the small one on top of the big one. I used the same-colored craft paper for the body and the smaller fin and used a darker shade for the bigger fin pattern.
- Attach the eye of the paper dolphin and use a pen to trace a simple smiling face.
- Trace and cut out the square shape from blue craft paper.
- Trace and cut out the wave patterns from a different color than the shade used for the square. Glue the wave patterns on the square paper cut-out; attach them on any one side along the width of the square.
- Glue the bottom side of the dolphin near the side (the side with the wave patterns). Keep the top side of the dolphin glue-free.
- Fold the square paper into half so that the square part of the craft can be used as a stand.
Frog

Frogs are fascinating amphibians that live in many different habitats around the world. They are not entirely land or water creatures; they start their life as tiny eggs laid in water, which then hatch into tadpoles with long tails. Tadpoles breathe through their gills and swim in the water. As they grow, their tails shrink, and they develop legs and lungs, allowing them to live on land as adult frogs. Frogs can leap long distances thanks to their powerful hind legs. They also have long, sticky tongues that they use to catch insects and other small prey. Some frogs can even change colors to blend in with their surroundings.
What You’ll Need for the Project:
- Colored craft papers
- Pencil – to trace the template
- Craft glue
- Sharpie or gel pen
- A pair of scissors
- Frog Template (opens in new window)
How to Make the Frog Paper Animals:
- Select green craft papers along with two different shades of pink papers for the frog craft. The template includes a head, body, lower legs, upper legs, blush, belly, eyes, and heart shape. Trace the template patterns on the selected craft paper and cut out the traced pattern.
- Attach the eye cutouts on the round extra parts on the top side of the head cutout.
- Attach the blush cutouts on both cheeks and use a sharpie to draw the mouth-line and nose of the papercraft frog figure.
- Glue the belly cutout to the bottom part of the body cutout.
- Attach the head cutout on the top side of the body pattern.
- Apply glue on the side of the body part, only on the edge where you’d like to attach the upper legs.
- Glue the upper legs on both sides of the body part.
- Trim the extra outer parts of the upper legs so that their edges align with the body.
- Attach the lower legs on both sides of the body part, near the bottom side.
- Slide the heart cutout under the upper legs.
Birds and Flying Creatures
Birds and other flying creatures are sometimes majestic and sometimes playful. They make terrific craft projects like these paper animals for your homeschool class. And along with each of these paper animals, we offer some interesting facts about each of the flying creatures.
Eagle
Eagles have long been symbols of strength, power, and independence throughout the world. Eagles roost in high and secluded places such as cliffs and trees. During the nesting season, the female lays 1-3 eggs and the adult pair takes turns incubating them. Hatching about 35 days later, the eagle chicks depend on both parents for food, warmth, and protection until they fledge at 10-14 of age. The eagles eat both live and dead fish, squirrels, birds, rabbits, muskrats, deer, possums, and anything else they can catch or find. Eagles are magnificent creatures.
What You’ll Need for the Project:
- Colored craft papers
- Googly eyes
- Marker
- Pencil
- Scissors
- Glue
- Eagle Template (opens in new window)
How to Make the Eagle Paper Animals:
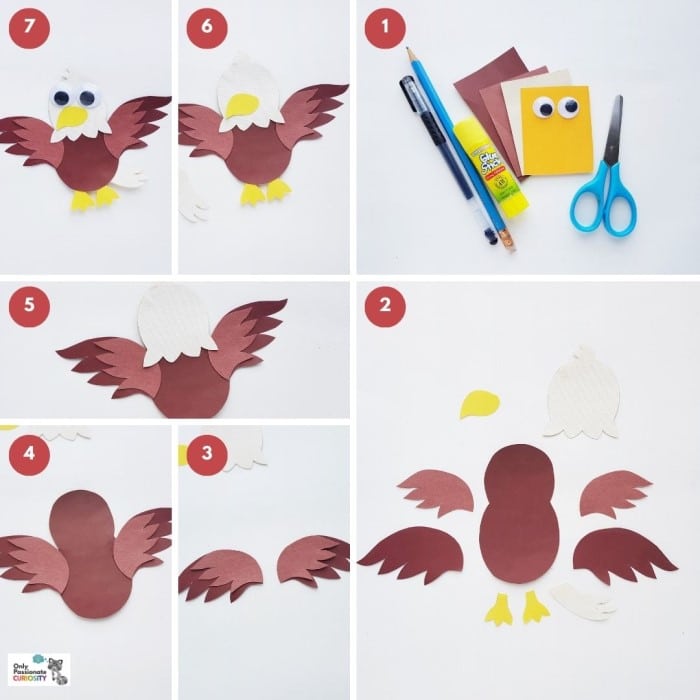
- Gather your supplies.
- Select yellow or orange paper for the beak and legs, at least two shades of brown craft paper for the wings and body, and white paper for the head. Trace the beak and leg patterns on the yellow or orange paper, the head pattern on the white paper, and the body and larger wings on the same shade of brown colored paper. Then trace the smaller wings on a different shade of brown colored paper. Cut out the traced patterns.
- Attach the small wings to the big wings by matching them along the curved sides.
- Attach the wings on both sides of the body pattern, by overlapping half a centimeter.
- Attach the head pattern on the head part of the main body.
- Attach the legs on the bottom side of the body and the beak on the head.
- Attach the googly eyes to complete the eagle paper craft.
Owl
There are roughly 200 different owl species in the world! Owls are nocturnal, which means they are active and do their hunting at night. Owls are very quiet when they fly. Most owls hunt insects, small mammals, and other birds. Owls have powerful talons that help them catch their prey. The largest owl in North America is the great gray owl, which can be up to 32 inches tall. The smallest owl in the world is the elf owl, which is only about five or six inches tall.
What You’ll Need for the Project:
- Colored craft papers
- Craft glue
- Pencil
- Scissors
- Black marker pen
- Owl Template (opens in new window)
How to Make the Owl Paper Animals:
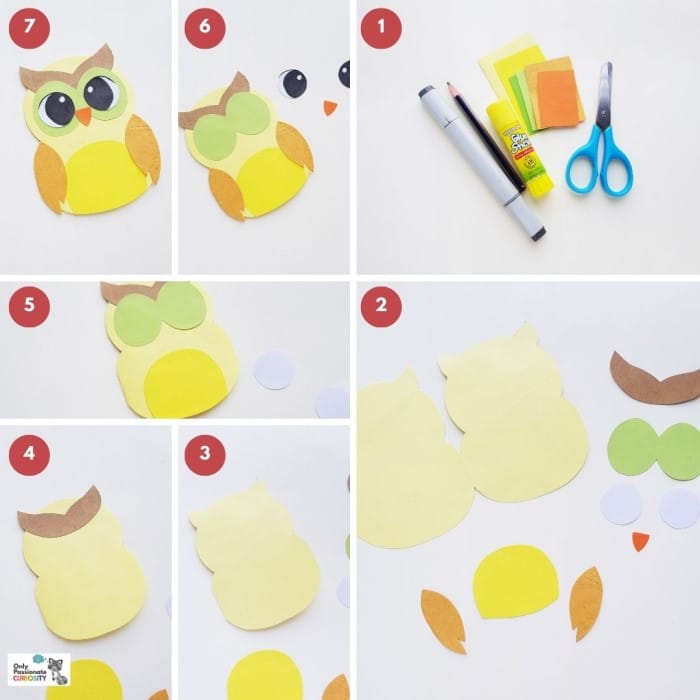
- Gather your supplies.
- Select colored craft papers of your choice and trace the template patterns on them. Cut out the traced patterns.
- Take the main owl card pattern and fold it in half to prepare the card.
- Now take the eyebrows pattern and glue it on the top side of the owl card. Make sure to match the pointy ends of the pattern with the owl card’s pointy ends on the top side.
- Glue the double-circle pattern right below the eyebrows pattern, by overlapping it slightly. Also, glue the semi-circular pattern on the bottom side of the owl card.
- Glue the wings on both sides of the owl card. Use a black marker to draw the eyes on the circle cutouts.
- Glue the eyes on each circle part of the double-circle pattern. Glue the beak (small triangle) in the middle of the two eyes to complete the owl card craft.
Penguin
Penguins are fascinating birds that live in the cold regions of the Southern Hemisphere. Penguins have special feathers that keep them warm in icy waters. They are excellent swimmers and use their wings to glide gracefully through the water. Some penguin species can dive as deep as 1,800 feet to find food! Penguins lay eggs and take turns keeping them warm by balancing them on their feet. Once the baby penguin, called a chick, hatches, both parents work together to feed and protect it until it grows big enough to survive on its own.
What You’ll Need for the Project:
- Colored craft papers
- Cardstock paper
- Sharpie
- Craft glue
- Pencil
- Scissors
- Penguin Template (opens in new window)
How to Make the Penguin Paper Animals:
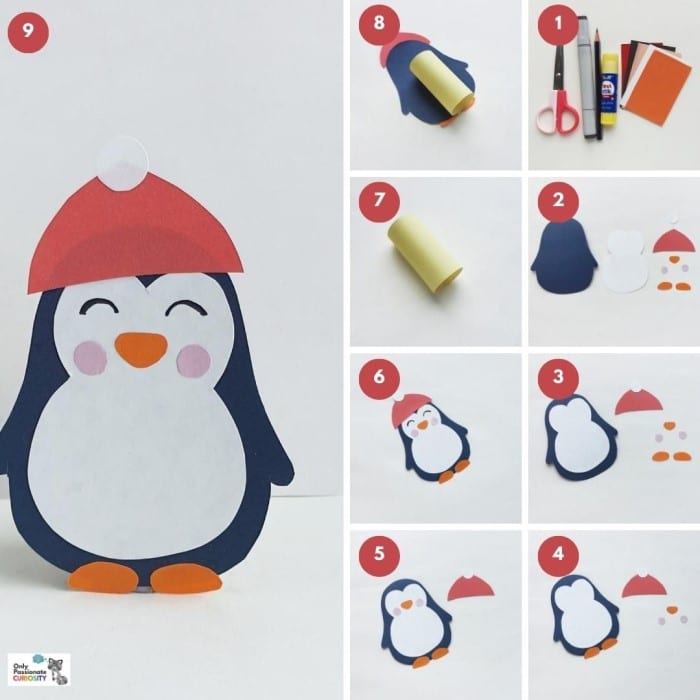
- Gather your supplies.
- Select black or dark blue, white or cream, orange, pink, and red craft paper for the penguin papercraft. Trace the body base on black paper, the inner base on white paper, the beak and feet on orange paper, the blush on pink paper, and trace the hat patterns on colored craft papers of your choice. Cut out the traced patterns nicely.
- Attach the inner base in the middle of the body base cut-out. Glue the small round cut-out (pompom) to the top pointy end of the hat cut-out.
- Attach the feet cut-outs on the bottom side of the body pattern.
- Attach the blush and the beak cut-outs on the head part of the inner base pattern.
- Use a sharpie to draw the eyes of the papercraft penguin figure. Glue the hat to the top of the head, overlapping the head slightly.
- Prepare a piece of cardstock paper and create a cylinder-shaped piece with it. The height of the roll should be less than the height of the papercraft penguin.
- Attach the papercraft roll on the backside of the papercraft penguin, near the bottom side. The roll should be positioned in a way to make the penguin stand.
- Check if the papercraft penguin can stand with the roll attached and the craft will be complete.
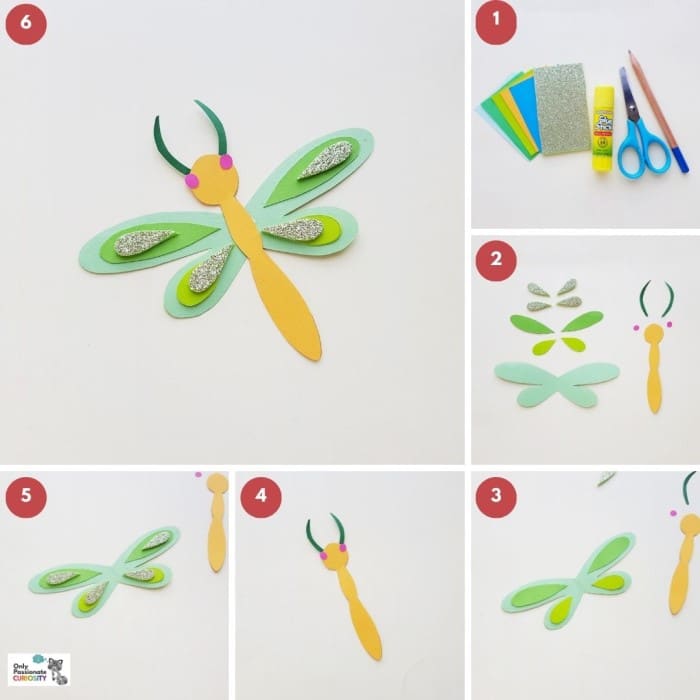
Dragonfly
Dragonflies are insects that can be found near ponds, lakes, and rivers all around the world. Dragonflies start their lives as eggs laid in water. When they hatch, they become nymphs and live underwater as they hunt and grow bigger. When it’s time to transform into adults, the nymphs climb out of the water and shed their skin. They emerge as colorful dragonflies with shimmering wings! Dragonflies have large eyes that help them spot their prey, like mosquitoes and flies, while they are flying. They are skilled flyers and can move in any direction – up, down, forward, and backward!
What You’ll Need for the Project:
- Colored craft papers
- Glitter foam sheets
- Pencil
- Scissors
- Glue
- Dragonfly Template (opens in new window)
How to Make the Dragonfly Paper Animals:
- Gather your supplies.
- Select different colored craft papers and glitter sheets for these paper animals. Prepare the template patterns by printing and cutting them out nicely. The template includes a wing base (a pair of wings) and teardrop patterns for the inner parts of the wings, two antennas, two small circles (eyes), and a body pattern. Trace and cut out the patterns from colored craft papers.
- Take the base wing patterns and attach the teardrop cut-outs inside the base wing pattern.
- I’m using glitter sheets for the smallest teardrop shapes. Attach the teardrop shapes on the base wings and decorate them as you like.
- Attach the two antenna cut-outs to the top side of the body pattern and stick the two small circles below the antennas, on the head part (top side) of the body.
- Now simply attach the body in the middle of the wing base to complete the dragonfly craft. You can use a pen or coloring pencil to trace strips along the bottom part of the body if you want to.
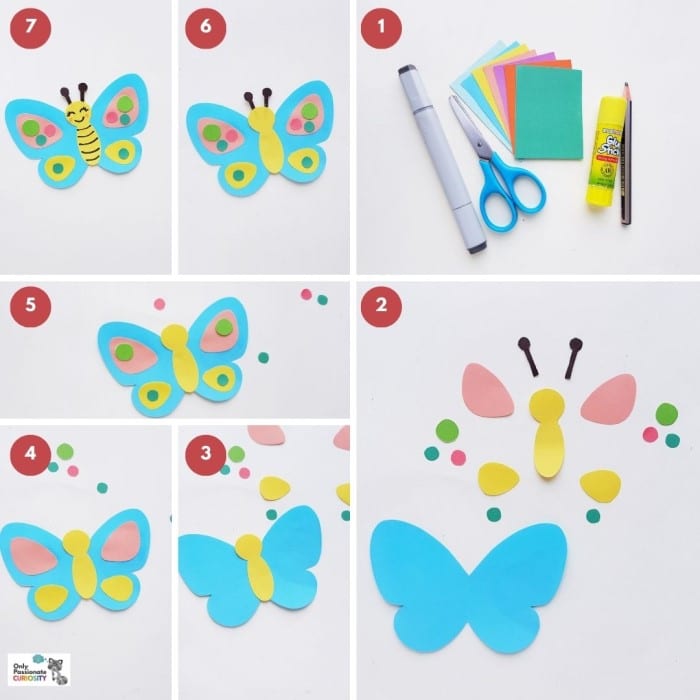
Butterfly
Butterflies are flying insects that start their lives as tiny eggs laid on leaves by their mothers. When the eggs hatch, out comes a caterpillar, also known as a larva. Caterpillars are hungry creatures and spend most of their time eating leaves. After a while, the caterpillar forms a chrysalis around itself. Inside the chrysalis, the caterpillar’s body changes until it emerges as a beautiful butterfly! Butterflies have delicate wings with vibrant colors and intricate patterns. They use their wings to fly from flower to flower, sipping nectar with their long tongues. Butterflies are important pollinators, meaning they help flowers reproduce by carrying pollen from one flower to another. Next time you see a butterfly fluttering by, take a moment to appreciate its grace and the wonder of its transformation.
What You’ll Need for the Project:
- Colored craft papers
- Black marker pen
- Craft glue
- Pencil
- Scissors
- Butterfly Template (opens in new window)
How to Make the Butterfly Paper Animals:
- Gather your supplies.
- Select different colored craft papers for the paper butterfly craft. Trace the template patterns on the selected craft papers. Cut out the traced craft papers using scissors.
- Take the wings pattern and attach the body part along the middle of the two wings.
- Attach the bigger pieces of the wing’s decoration patterns on the two wings.
- Now attach the smaller pieces (circles) to the bigger pieces of the wing’s decoration patterns.
- Attach the antennas to the top end of the head part.
- Use a black marker pen to draw the eyes and mouth of the paper butterfly. You can also trace strips along the body part of the paper butterfly.